LangGraph CLI 快速入门
什么是 LangGraph CLI
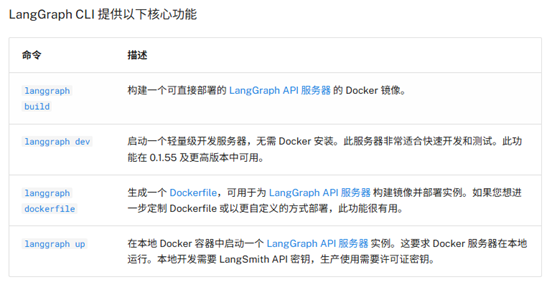
LangGraph CLI 是一个多平台命令行工具,用于在本地构建和运行 LangGraph API 服务器。生成的服务器包含图的所有运行、线程、助手等的 API 端点,以及运行代理所需的其他服务,包括用于检查点和存储的托管数据库。
环境准备
Python 版本要求
Python >= 3.11
创建虚拟环境
# 安装虚拟环境库
pip install virtualenv

# 创建虚拟环境
virtualenv env_name

# 激活虚拟环境(Windows)
env_name\Scripts\activate

# 激活虚拟环境(Linux/Mac)
source env_name/bin/activate

# 退出虚拟环境
deactivate
安装与创建应用
安装 LangGraph CLI
pip install --upgrade "langgraph-cli[inmem]"
创建新应用
langgraph new path/to/your/app --template new-langgraph-project-python
如果未指定模板,会显示交互式菜单供选择。
(fastapi_env) C:\Users\21129\Documents\百度网盘\langgraphAgent>langgraph new langgraph-demo
🌟 Please select a template:
1. New LangGraph Project - A simple, minimal chatbot with memory.
2. ReAct Agent - A simple agent that can be flexibly extended to many tools.
3. Memory Agent - A ReAct-style agent with an additional tool to store memories for use across conversational threads.
4. Retrieval Agent - An agent that includes a retrieval-based question-answering system.
5. Data-enrichment Agent - An agent that performs web searches and organizes its findings into a structured format.
Enter the number of your template choice (default is 1): 1

You selected: New LangGraph Project - A simple, minimal chatbot with memory.
Choose language (1 for Python 🐍, 2 for JS/TS 🌐): 1
📥 Attempting to download repository as a ZIP archive...
URL: https://github.com/langchain-ai/new-langgraph-project/archive/refs/heads/main.zip
✅ Downloaded and extracted repository to C:\Users\21129\Documents\百度网盘\langgraphAgent\langgraph-demo
🎉 New project created at C:\Users\21129\Documents\百度网盘\langgraphAgent\langgraph-demo
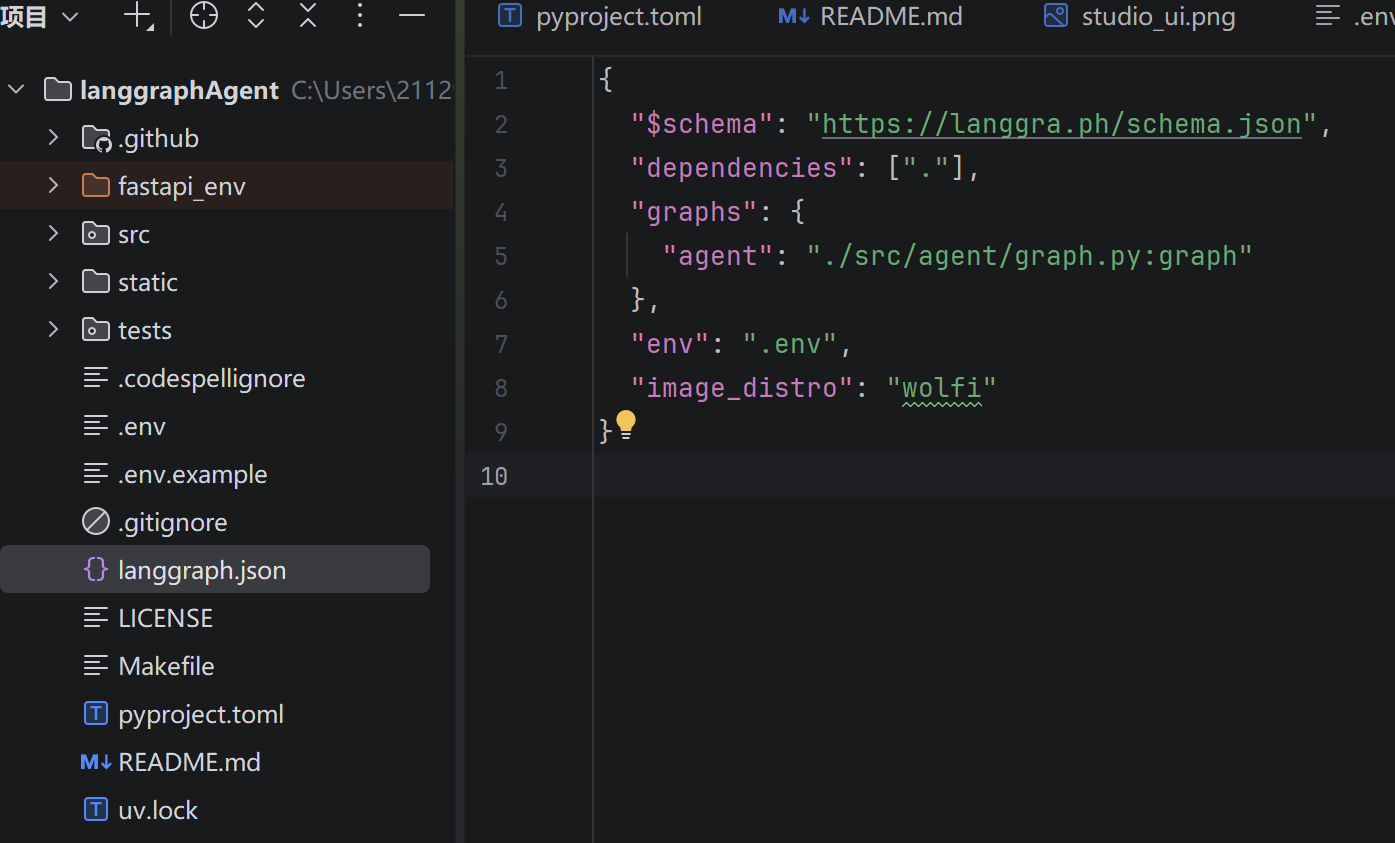
langgraph.json 是整个项目的配置文件。
{
  "$schema": "https://langgra.ph/schema.json",
  "dependencies": ["."],  // 当前目录
  "graphs": { // 智能体对象
    "agent": "./src/agent/graph.py:graph"
  },
  "env": ".env", // 环境变量 env
  "image_distro": "wolfi" // docker 镜像导出方式
}
安装项目依赖
cd path/to/your/app
pip install -e .
注意:LangGraph 使用
pyproject.toml替代传统的setup.py和requirements.txt
配置 Agent
编辑 graph.py 文件,配置您的大模型和工具:
import os

from langchain_classic.agents import create_react_agent
from langchain_openai import ChatOpenAI
from dotenv import load_dotenv
load_dotenv()
OPENAI_API_KEY = os.getenv('OPENAI_API_KEY')
llm = ChatOpenAI(
    temperature=0.5,
    model='gpt-4o-mini',
    api_key=OPENAI_API_KEY,
    base_url='https://xiaoai.plus/v1'
)

def get_weather(city: str) -> str:
    """Get weather for a given city."""
    return f"城市: {city},今天的天气晴朗,气温在 28 摄氏度!"

graph = create_react_agent(
    llm,
    tools=[get_weather],
    prompt="你是智能助手!"
)
启动服务器
langgraph dev
langgraph dev 以内存模式启动服务器,适用于开发和测试。生产环境需要配置持久存储后端。
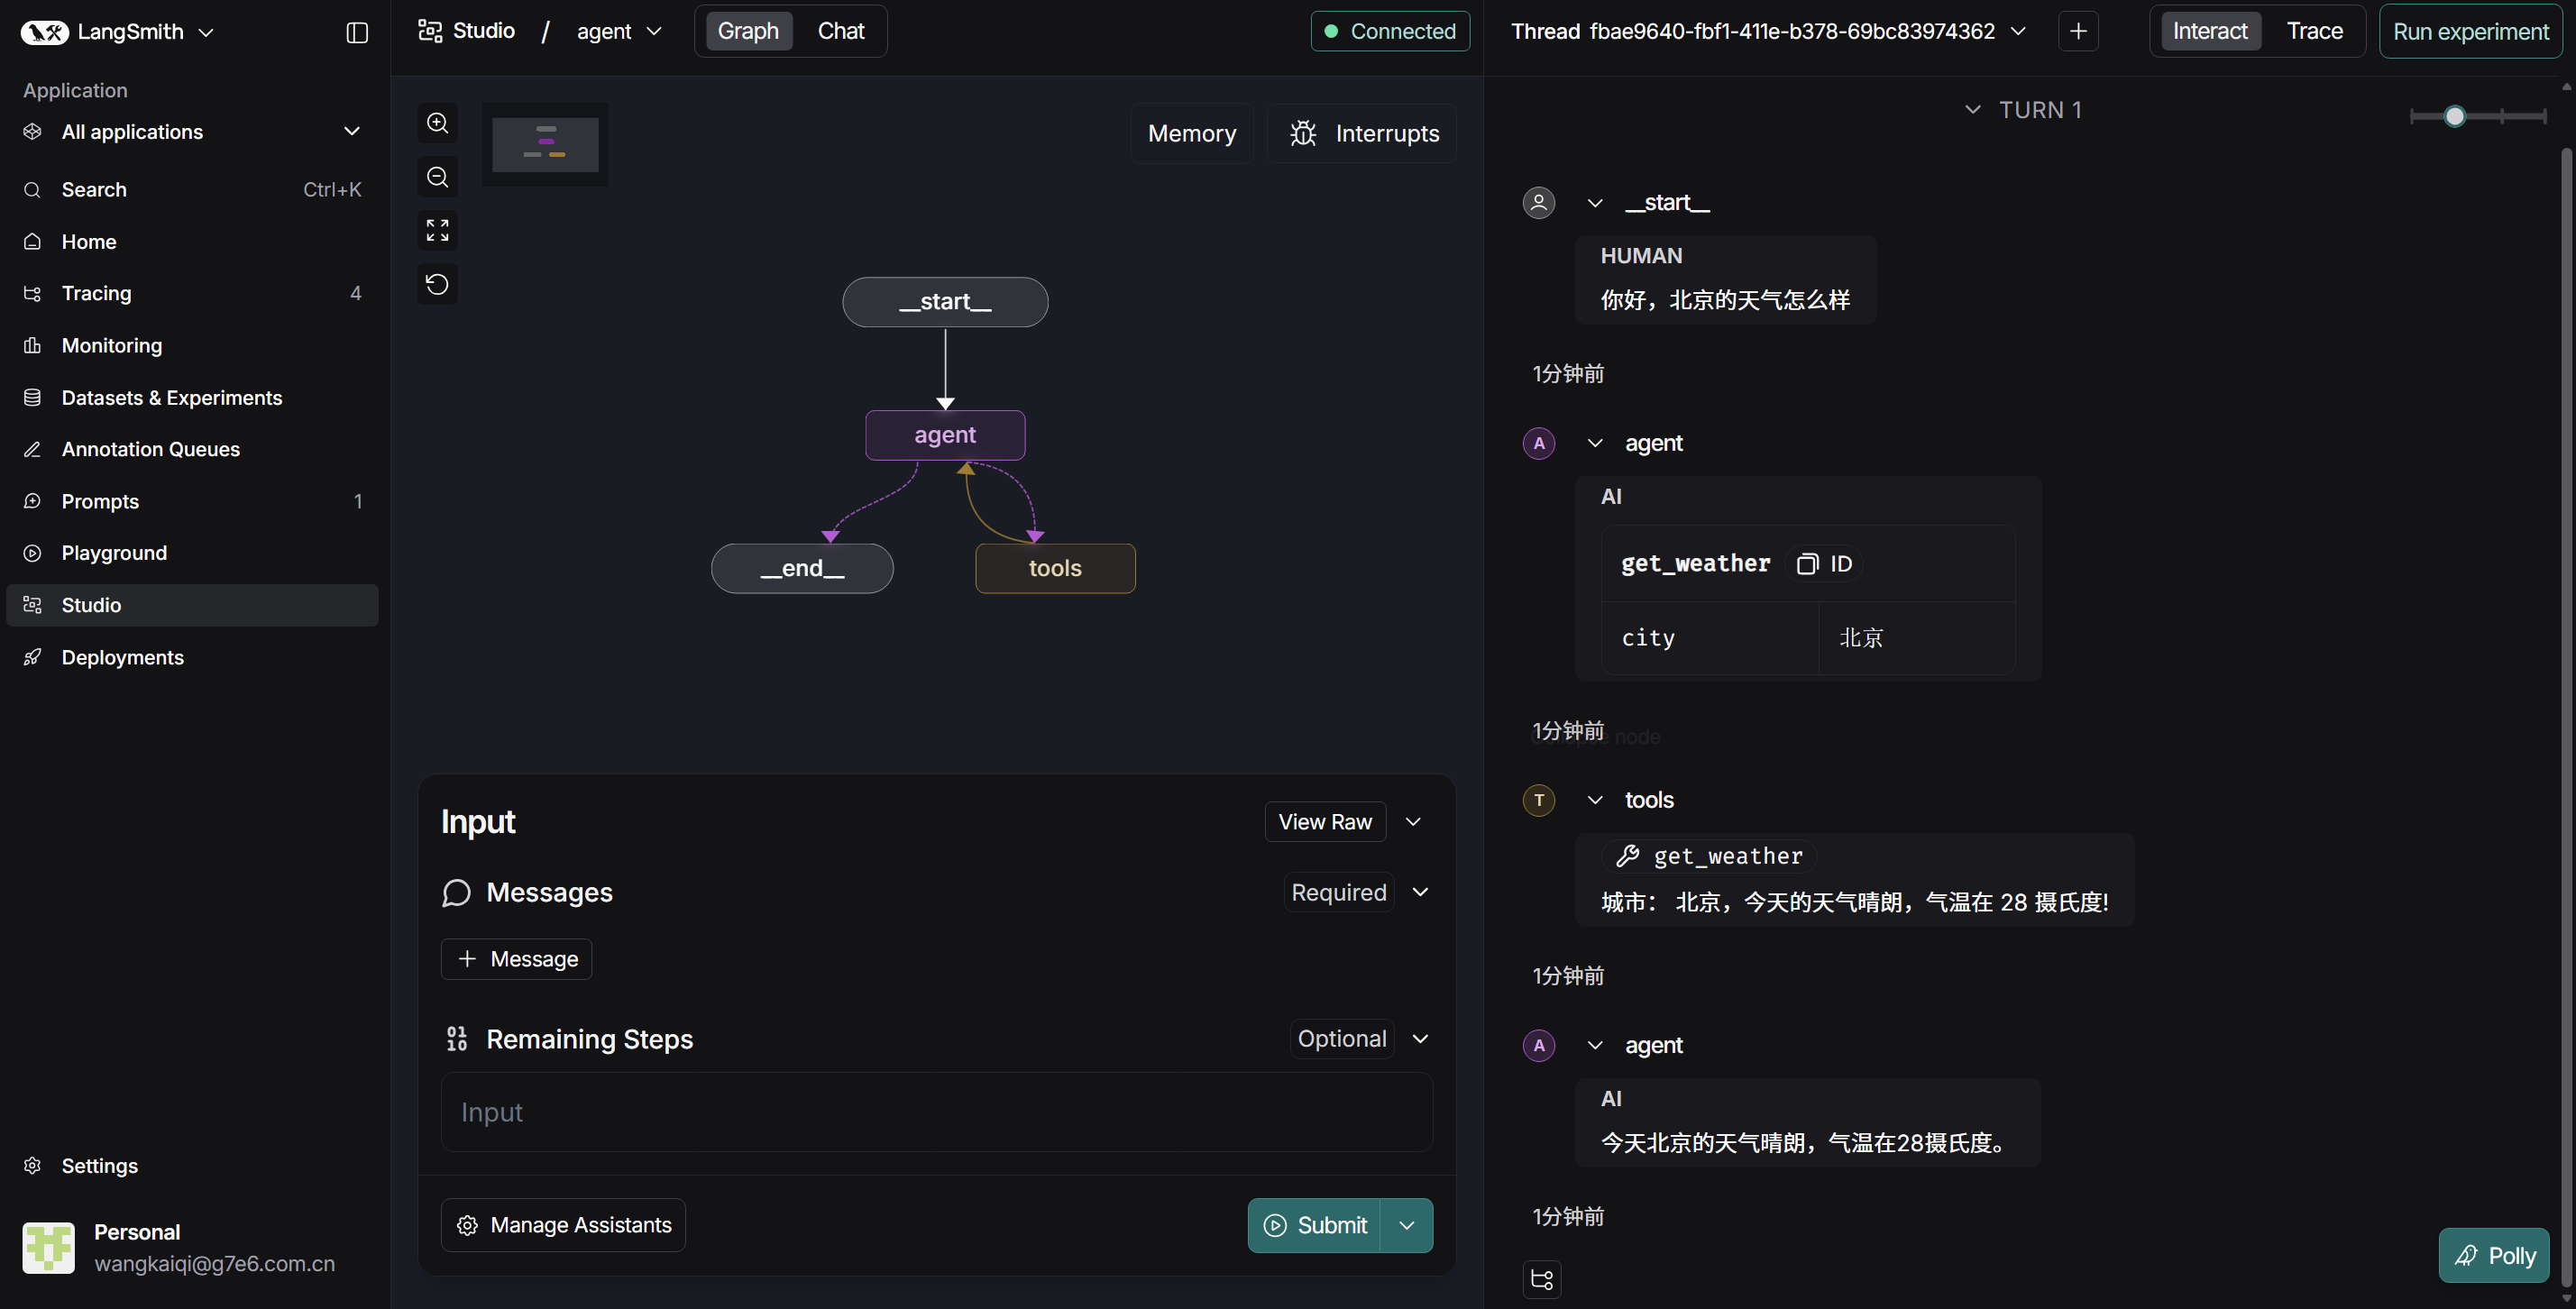
启动后可通过 LangGraph Studio(本地 UI)访问和调试您的 Agent。
langgraph dev 选项
| 选项 | 默认值 | 说明 |
|---|---|---|
-c, --config | langgraph.json | 配置文件路径(声明依赖项、图和环境变量) |
--host | 127.0.0.1 | 服务器绑定的主机 |
--port | 2024 | 服务器绑定的端口 |
--no-reload | - | 禁用自动重载 |
--n-jobs-per-worker | 10 | 每个工作进程的作业数 |
--debug-port | - | 调试器监听端口 |
--wait-for-client | FALSE | 等待调试器客户端连接后再启动服务器 |
--no-browser | - | 启动时跳过自动打开浏览器 |
--studio-url | https://smith.langchain.com | LangGraph Studio 实例 URL |
--allow-blocking | FALSE | 允许同步 I/O 阻塞操作 |
--tunnel | - | 通过 Cloudflare 公共隧道暴露本地服务器 |
╦  ┌─┐┌┐┌┌─┐╔═╗┬─┐┌─┐┌─┐┬ ┬
║  ├─┤││││ ┬║ ╦├┬┘├─┤├─┘├─┤
╩═╝┴ ┴┘└┘└─┘╚═╝┴└─┴ ┴┴  ┴ ┴

- 🚀 API: http://127.0.0.1:2024
- 🎨 Studio UI: https://smith.langchain.com/studio/?baseUrl=http://127.0.0.1:2024
- 📚 API Docs: http://127.0.0.1:2024/docs

This in-memory server is designed for development and testing.
For production use, please use LangSmith Deployment.
常用示例:
# 修改端口
langgraph dev --port 3000

# 禁用自动重载(生产模式)
langgraph dev --no-reload

# 通过隧道暴露(解决 localhost 连接问题)
langgraph dev --tunnel

# 禁用浏览器自动打开
langgraph dev --no-browser
测试方式
Python SDK
pip install langgraph-sdk
异步方式:
from langgraph_sdk import get_client
import asyncio

client = get_client(url="http://localhost:2024")

async def main():
    async for chunk in client.runs.stream(
        None,  # Threadless run
        "agent",  # Name of assistant
        input={
            "messages": [{
                "role": "human",
                "content": "What is LangGraph?",
            }],
        },
    ):
        print(f"Event: {chunk.event}")
        print(chunk.data)

asyncio.run(main())
同步方式:
from langgraph_sdk import get_sync_client

client = get_sync_client(url="http://localhost:2024")

for chunk in client.runs.stream(
    None,
    "agent",
    input={"messages": [{"role": "human", "content": "What is LangGraph?"}]},
    stream_mode="messages-tuple",
):
    print(f"Event: {chunk.event}")
    print(chunk.data)
JavaScript SDK
npm install @langchain/langgraph-sdk
const { Client } = await import("@langchain/langgraph-sdk");

const client = new Client({ apiUrl: "http://localhost:2024"});

const streamResponse = client.runs.stream(
    null,
    "agent",
    {
        input: { "messages": [{ "role": "user", "content": "What is LangGraph?"}] },
        streamMode: "messages-tuple",
    }
);

for await (const chunk of streamResponse) {
    console.log(`Event: ${chunk.event}`);
    console.log(JSON.stringify(chunk.data));
}
REST API
curl -s --request POST \
    --url "http://localhost:2024/runs/stream" \
    --header 'Content-Type: application/json' \
    --data '{
        "assistant_id": "agent",
        "input": {
            "messages": [{"role": "human", "content": "What is LangGraph?"}]
        },
        "stream_mode": "messages-tuple"
    }'
速记要点
| 步骤 | 命令 | 关键点 |
|---|---|---|
| 创建环境 | virtualenv env_name | Python >= 3.11 |
| 安装 CLI | pip install langgraph-cli[inmem] | 带 inmem 后缀 |
| 创建项目 | langgraph new --template python | 选模板 |
| 安装依赖 | pip install -e . | 编辑模式 |
| 启动服务 | langgraph dev | 内存模式 |
| 测试 API | SDK / REST | 四种方式 |
核心一句话
LangGraph CLI = 一套命令 + 一个图 + 多个 API
记忆口诀
- 安装:pip install langgraph-cli
- 创建:langgraph new
- 启动:langgraph dev
- 测试:四种方式(Studio / Python / JS / REST)